Process of creating the self-signed system certificates

The first thing to have when creating an AS2 Organization is an AS2 certificate to use for the signing and encrypting of your data. The public portion of this certificate will be sent to your partner, later, for their use.

To do this go to:

Trading Partner>Digital Certificates>System

image

Enter  on  GO! button.

image

Enter a Name and Organization, then hit [Next].

image

Enter a Serial Number (it can be any random number or something specific), Duration in ‘days’, change the Key Length to 1024 or 2048. Then hit [Next], [Finish] and [Return].

Creating the AS2 certificate is done.

You can verify it by going to Trading Partner>Digital Certificates>System>List ALL

You should see something like:

image

While we are here lets check it out for future use.

Click check out.

image

Leave BASE64 checked and hit [Go!]

This will open a notepad entry with the public certificate information in it.

image

All you need to do is save the notepad file to your system somewhere where you can access it later.

image

Hit File>Save As and save it to a location for later use. Notice on mine I clearly marked it ‘… 4 partner.cer’.

Process of creating the AS2 Organization

Go to Trading Partner>AS2>AS2 partner or organization [Go!]

image

Select Organization and click [Next]

Identity Name: is an internal identity.

AS2 Identifier: is the identifier that you will give your partner that they will know you as. It can be your telephone number, DUNS number or your Company Name, or portion of your Company name. When your partner sends data to you this is the identifier that will be in the ‘AS2 To:’ portion of the AS2 Header. Likewise when you send your partner data it will be in the ‘AS2 From:’ portion of the AS2 Header.

Profile Name: is the name of the profile as seen from the SI ui.

Exchange Certificate: this certificate will be the same certificate you created earlier in this blog. Simply click on Configure Certificates. Then in the pop up window, highlight the certificate you want to use, again in our case it’s the same one we created earlier (BLOG_AS2_certificate), then hit the arrow button that points to the right, then click [Save].

Signing Certificate: repeat the steps above using the same certificate.

Followed by [Next], [Finish] and [Return].

AS2  Organization  has been created.


Process of creating the AS2 Partner

Go to Trading Partner>AS2

image

Click [Go!] under Create New – AS2 partner or organization

image

By default Partner is checked, Click [Next]

image

By default Create New Identity is checked, Click [Next]

image

Identity Name – Give your AS2 Partner profile an Identity Name. It’s an internal name used by SI.

AS2 Identifier – Use the AS2 Identifier your part sent to you. In our case it is Some_Company

Click [Next]

image

Profile Name – Enter a name

HTTP Client Adapter – defaults to the out of the box service. You can use it or a custom one.

End Point – Use the end point that your partner give you. In our example it’s http://localhost:63233/as2

Response Timeout (sec) – This timeout is used during the initial connection to your partners side. It may need to be increased if set too low.

SSL – defaults to None. If you are to set up SSL with a partner this is where you would do it…FYI. In our example we are using the default of None.

image

Now we need to point to the certificate that you recently checked in from your partner.

Click ‘Configure Certificates’ next to Exchange Certificate.

This will open a pop up window that displays all your Trusted Certificates.

Highlight the certificate you want to use under the Available side and click the right arrow -> to move it to the Certificates Used side.

image

Click [Save]

image

Repeat the above steps for the Signing Certificate as well.

image

Check MDN Receipt if you are planning on passing MDN’s to your partner. In our example, we are.

Click [Next]

image

Delivery Mode – Referring to the MDN defaults to Synchronous.

Click [Next] and [Finish].

The AS2 Partner has been created!

You can verify by going to

Trading Partner>AS2

Click [Go!] next to Search Profiles by Identity – ALL

You should see some thing similar to the following:

image

Click [Return]

Creating the AS2 Relationship

Go to Trading Partner>AS2

image

Click [Go!] next to Create New – AS2 trading relationship

image

Click in the empty Organization field and start typing the name of the Organization. Double click it and it will fill the field.

Repeat the same steps for the Partner field.

Click [Next]

image

These are parameters that will be used to build all the ‘things’ mentioned at the beginning.

Take defaults, click [Next]

image

By default it looks like the schedule will be running every 5 minutes. Do you see that?

Click [Next] and [Finish]

The AS2 Relationship has been created!


LATEST EDI INTERVIEW QUESTIONS

1)Explain MAP EXECUTION FLOW PROCESS?

2) What are the  PRE-SESSION RULES and explain them?

3)How do we create SYNTAX TOKENS?

4)How do we create  DDF/IFD’S?

5) Explain the  C ERROR,MESSAGE BOX functions?

6) How to convert DATE TO STRING?which function was used for that?

7)Explain about  INTERNAL  CODELIST & EXTERNAL CODELIST?

8) If we connect one field from  input to output  in 3 ways like 1)SIMPLE LINK,2)STANDARD RULES, 3)EXTEND RULES.  Then which one takes the high priority for output side field?

9)Explain some  MAP TRANSLATION ERRORS in  REAL TIME?

10) Explain about  INDEXES ?

11)What is the use of  USER EXIT FUNCTION?

12) I want to increment 5 days/weeks/years/seconds/minutes/hours from the current date/week/year/seconds/minutes/hours… Then how? (Real time scenario)

13)explain about mapping structure?

14)How to schedule BP & explain that?

15)What is process to send files to trading partner using SFTP protocol?

16)What is process of setup the AS2  partner and what are the files to require for that?

17) If we send a 850 (purchase order)map file using AS2 protocol and we receive 997 (functional acknowledgement). which service was  using to know the acknowledgement received or not using AS2 protocol?

18)If we receive a encrypted message for our trading partner which key will be used for to decrypt that message?

19) Explain some Business Process errors faced in Real time environment?

20)what are the uses of propertyfiles?


Obtaining the Current Date/Time through Extended rule

For Gentran Server for Windows you will use the GentranEx.DLL

Object obRules;

obRules = CreateObject(“GentranEx.Rules”);

#Date_field = obRules.GetDate();

#Time_field = obRules.GetTime();

deleteobject(obRules);

For Gentran Integration Suite you will use a java command

object java_date;

datetime current_date_time;

java_date = new(“java.util.Date”);
current_date_time = java_date;

#DATE_FIELD = current_date_time;


IBM Sterling Connect:Direct

          IBM® Sterling Connect:Direct® is point-to-point (peer-to-peer) file-based integration middleware meant for 24×365 unattended operation, which provides assured delivery, high-volume, and secure data exchange within and between enterprises. It is optimized for high performance and throughput and moves files containing any type of data (text, EDI, binary, digital content, image) across multiple platforms, disparate file systems, and disparate media. It is used by many industries throughout the world to move large volumes of data and for connecting to remote offices.

Benefits

Sterling Connect:Direct offers the following benefits:

  • Predictability—Assures delivery via automated scheduling, checkpoint restart, and automatic recovery/retry. If a data transmission is interrupted, the transmission tries to restart at a predefined interval for a configured amount of time. All activity and statistics are logged so that there are verifiable audit trails of all actions.
  • Security—Ensures customer information stays private through a proprietary protocol and offers basic security through authentication and user proxies. Supports a comprehensive cryptographic solution (IBM Sterling Connect:Direct Secure Plus) that provides strong mutual authentication using X.509 certificates, SSL, and TLS data encryption, and data integrity checking. For more information about Sterling Connect:Direct Secure Plus and other products that enhance Sterling Connect:Direct‘s security model, see Extending the Capabilities of Sterling Connect:Direct.
  • Performance—Handles the most demanding loads, from high volumes of small files to terabyte files.
    If you want to know further information click on this link: Sterling connectdirect1

IBM Sterling Control Center

Sterling Control Center Benefits

The Sterling Control Center offers numerous benefits, including:

  • Improved SLA performance
  • Improves customer satisfaction
  • Fewer missed deadlines due to faster response to problems
  • Reduced complexity and effort required for configuration


HOW TO DO A MASS UPDATE ON THE ENVELOPES IN GIS

Problem:

For example, you’ve created a lot of envelopes on the Development server and all
of them use test Sender and/or Receiver ID, Test Indicator = T and so on. You need
to change and move these envelopes to your Production environment but it would take a lot of time changing them one by one.

Solution 1:


You can export the envelopes you want to change into an XML file, open this file in a text editor and make your changes. Here are the step-by-step instructions:

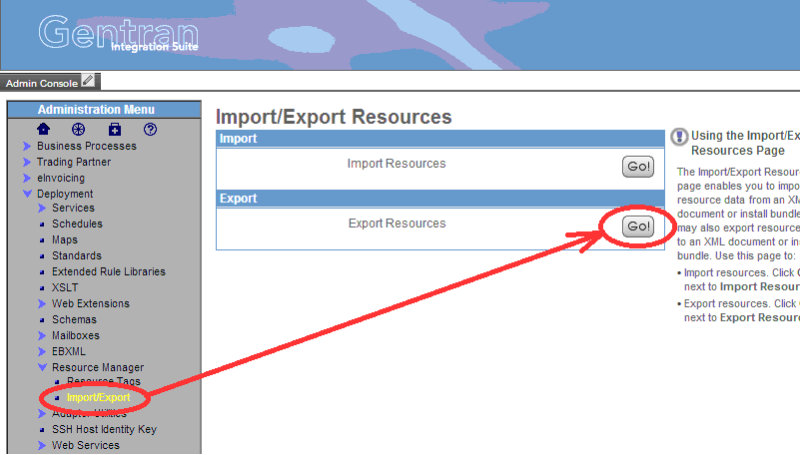
  1. Go to Deployment -> Resource Management -> Import/Export
  2. Click on the Export -> Go button

001

3.Select “XML Document” (default) and click the “Next” button:

4.Select “No” for “Do you wish to export resources based on a tag name?” (default)
and click the “Next” button:

5.Select “Standard” for ” Which type of export should be performed on versioned resources?”
(default) and click the “Next” button:

6.Select “Trading Partner Data” and click “Next”:

7.Select “Envelopes” and click “Next”:

8.Select “No” for ” Export Private Certificates ?” (default) and click the “Next”
button:

9.Select the envelopes you want to change and click “Next”:

10.Enter the Passphrase (you’ll need it when you do Import) and click “Next”:

11.Click “Finish”:

12.Download Export.xml file:

13.Open it in any text editor. I prefer to use special XML editors, but it’s possible
to use MS Notepad:

14.Select Edit -> Replace (or click Ctrl + H), enter appropriate values and click
“Replace All”:

15.save the file.

16.Import it into appropriate instance of GIS.

EDI Sterling Integrator frequently asked interview questions

1. Explain the EDI Flow?

2.How the translator will work?

3. If you want to add 6 days with your date what function you should use?

4. In the given string how will you count the characters of the string?

5.what is the use of select in the standard rule?

6. what is code list?

7. What is the difference between Internal code List and External Code List?

8. Difference between promote and split?

9. Envelop structure in X12 and EDIFACT?

10. Types of Errors?

11. what is Conditional Relationship Error?

12. what is Syntax Token?

13. what is Accumulator?

14. what is Standard Rule?

15. what is Extended Rule?

16. what is Use Constant in Standard Rule?

17. what is the use of Trim Function?

18. What is the difference between Normal segment and Floating segment?

19. What is the length of ISA Segment?

20. What is user Exit Function?

21. Explain the structure of 850 and where you find the Hash Total and which is the detail level?

22.What are the levels of ASN in that which one is optional?

23. What is the difference between 4.3 and 5.2?

24. what is the difference between Public key and Private Key?

25.What is the difference between FTP and SFTP and FTPs?

26.In Which envelop you will find the Test Indicator at which element?

27. What is the difference between Restart and Resume?

28. Difference between services and Adapter?

29. What are the services you are used?

30.  What are the services you are used for configuring the FTP?

31. What is Primary Document and What is Process Data?

32. What is Encoder Service?

33. Explain Inbound and Outbound BP Flow?

34. What is DOM to Doc and DOC to DOM?

35.what is EDI?

36.what are the levels in EDI message format?

37.what are transactions you have worked?

38.what are protocols using for communication?

39.what is the complex transaction set you have worked till now?

40.what are the difference between ANSI X12 message and EDIFACT messages?

41.How you will validate flat file structure?

42.what are the levels in EDI 856 message format?

43.Can you please tell me something about EDI 850 or EDI 810 or EDi 856 messages?

44.which field having purchase order number in EDi 850message?

45.what are the different types of purchase orders (EDI 850)?

46.where you can identify the purchase order number in Advance shipment notice (EDI 856) message?

47.can you please explain some thing about ISA and GS envelopes?

48.Tell us about your system architecture?

49.Explain about AS2 partner setup?

50.What are the services and adapters are used recently?

51.why we are using LWJDBC adapter in BP?

52. What is EDI de-envelope service?